Posts tagged 'Web'

Firefox 3: Preview of the User Interface

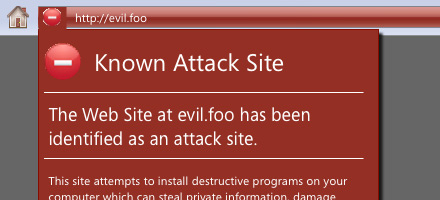
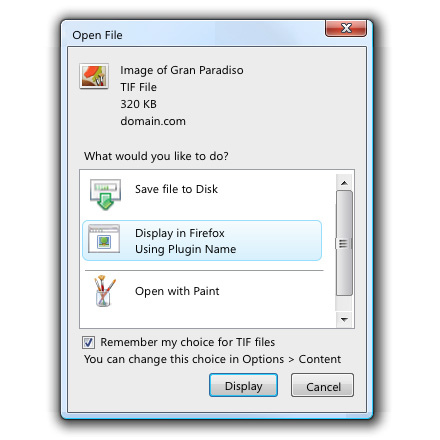
Hooray! Everyones favorite open-source browser will keep on innovating with an overhaul to the bookmark feature, improved security awareness, and finally a consistent method to handle various MIME types.

Firefox 3 Bookmarks

Firefox 3 Malware Prevention

Firefox 3 MIME Type Preferences

See more at Techdo.com

Banner Ads Get A Little Smarter

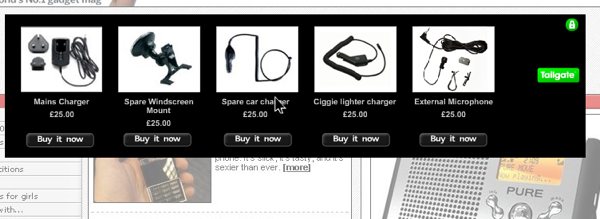
Banner ads have been around on the web for ages but Tailgate wants to spruce these ancient advertisements. Utilizing AJAX, a user can purchase a product right inside the banner ad without clicking through to another site or leaving the page they are currently on. Take a look for yourself.

Tailgate benefits all parties involved…

  • The customer gets what they want right away with little hassle.
  • Advertisers make buying impulse items easier.
  • The publisher retains their visitor while still profiting from the advertisement.

Tailgate Web 2.0 Banner Ad

I think the publisher really benefits the most here because they can earn more money via this affiliate behavior which is more valuable than a simple click through. I hope there is still a good chunk of the web population that is not immune to banner ads since they easily can become invisible to repeat visitors.

There are also possibilities for security concerns as there is no way to ensure the credit card information entered is sent over a secure connection or if the company on the other end is even legitimate.

It is still nice to see some innovation in a space that has been dead to me for quite some time.

This Is What The Internet Used To Look Like

Bland pages with sporadic imagery was the norm for this “global, electronic mall that is underconstruction.” Those were the days.

New Internet Mini-series: The West Side

Former DV Guru blogger Ryan Bilsborrow-Koo let me in on his new side project The West Side. Set in a unique, alternate universe, it melds together elements of two disparate film genres: the grit of an urban setting with the tradition of the American Western.

The West Side

After watching the single episode on the site I left astounded. The black and white treatment fits the tone of the story perfectly although technically there is some distracting digital noise in some dark scenes. That’s alright because the story definitely piques my interest as we follow Qasim, played by Damian Washington, as he introduces us to the desolate urban city in search of a drink. The episode felt a tad sluggish but at the end I wanted more. Hopefully The West Side can deliver episodes consistently as it builds its audience on the open frontier of the Internet.

Watch Episode 1 of The West Side.

Online Identity Calculator

For those who need to know how web popular they are on a scale of 1-10 will love the Online Identity Calculator (beta) from CareerDistinction.com.

Distinct Careers Quiz

Before you rush on over there and begin filling out the form I will cut straight to the chase — this quiz just asks you to Google yourself and provide some basic job info. Hmm… a company that is all about careers trying to collect necessary info for their job in exchange for a meaningless quiz? Sounds fishy.

P.S. I got a 7.5/10!

How To Set Up Postie With WordPress

For the past week I have been fiddling with Postie, a WordPress plugin that allows posting via e-mail or a mobile phone. The following instructions are specific to WordPress 2.2, Postie 1.1.1, and a DreamHost server. Most information in this walk through can be applied to other configurations but, as a disclaimer, your mileage may vary. I will assume you have a stable WordPress installation already up and running.

First we need to download and install the Postie plugin. To get the files, go to http://www.economysizegeek.com/?page_id=395 and download Postie version 1.1.1 for WordPress 2.1 or higher or get Postie version 1.0.1 for WordPress 2.0. If you’re running an older version of WordPress you will need to look around for an earlier version of Postie.

Unpack the Postie plugin and upload it to your plugins directory at wp-content/plugins/postie. Login to your WordPress Admin interface and click on the Plugins section. Postie should now be a listed plugin; simply click Activate to turn it on. If you go to Options and then the Configure Postie subsection you will see the many configuration options to tweak Postie just the way you want it. There are too many options to explain here, besides most of them need no explanation.

In order for Postie to post the e-mails you send it, you need to authorize your e-mail address. Any e-mail not listed here will be rejected with the option for you to be notified so you can see who is trying to mess with your system.

Defining the directories where Postie will save your images to is pretty important. The default location is within your blog installation root, but this was causing some problems when I ran the configuration test later on. I ended up setting the directories in the Postie folder, or /wp-content/plugins/postie/wp-photos/ and /wp-content/plugins/postie/wp-filez/. These seemed to fix the issues running the tests and when I finally posted images on my blog but I don’t know how important it is to change this.

The banned files list lets you strip out the unnecessary clutter mobile carriers tack on when you send an e-mail or removing signatures. It’s best to send an e-mail to yourself just to see what kind fluff gets added to your message.

Image settings and 3GP settings can be set to taste, leaving us at the most important configuration — the Mailserver Settings. Postie supports Pop3, Pop3 SSL, IMAP, and IMAP SSL. However Dreamhost doesn’t have IMAP support in their out-of-the-box PHP installation. If you really want these features you can always compile your own PHP installation but for our purposes we will just stick with basic Pop3.

You need a mail server that will let you authenticate over a non secure connection. This means Gmail is out because you need Pop3 with SSL in order to authenticate your account. DreamHost users can use their own mail server usually at mail.yourdomain.com with the default port of 110. Your mail ID needs to include the domain name at the end like something@domain.com. This step really hung me up since it was never made clear. If you want a super hard to guess mail ID use GRC’s Ultra High Security Password Generator. Nothing like a bunch of random characters to ease the mind of the super paranoid. Click Update Options to save your changes.
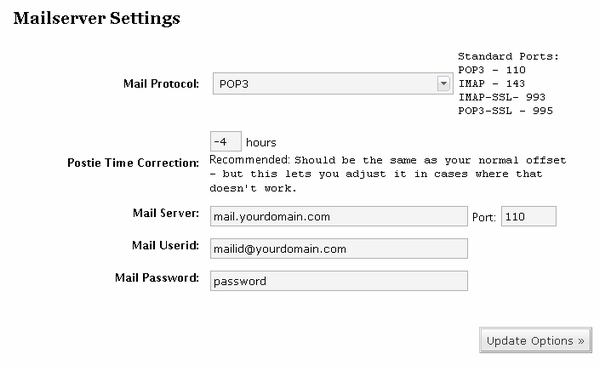
Mailserver Settings

Now we should have everything set-up so we can begin to post from the field. To make sure things are working ok, run the Configuration Test. This will let you know if your mail settings are correct and if Postie can find and write to your image and filez directories. Hopefully everything checked out ok here. If they didn’t go back and double check your settings.

Now we can go back and run Postie manually. Before doing this we need to have a message on the mail server for Postie to grab. Hit the Run Postie button and watch in amazement. You’ll know if Postie pulled your message down otherwise you will most likely get the vague message There does not seem to be any new mail. If you do get that message, check your e-mail account to verify there is an unread message sitting there. If that’s not the problem it is most likely an authentication or mail ID issue.

Check your blog to see what Postie did with your current settings. If it is outputting something different than you expected, go back and tweak the settings, send a new message to your e-mail account and run Postie again. I didn’t like the markup coming from Postie so I went into the /wp-content/plugins/postie/postie-functions.php file and cleaned up a little bit.

We are almost done setting up Postie. All that is left is to set-up a CRON Job in order to run Postie at a specified interval. As it is now we would have to login to WordPress and manually run Postie whenever we wanted to make a post via e-mail. Normally you would have to shell in and type a bunch of archaic commands into a Unix prompt to set this up, but DreamHost makes this easy with their Cron Jobs tool. Login to your DreamHost Panel at https://panel.dreamhost.com and click on Goodies -> Cron Jobs. Click Add New Cron Job and copy and paste the following command, replacing the domain info with your own.

curl http://www.yourdomain.com/your-WP-Directory/wp-content/plugins/postie/get_mail.php

When this CRON Job is run, the server will go to the URL, triggering Postie and publishing your post. Be careful when determining the interval for running the CRON Job because running it too frequently uses CPU cycles and shared hosting companies don’t really like that. Running once an hour should be fine for most needs.
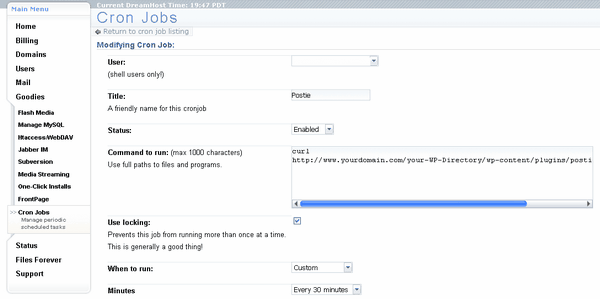
CRON Job

A major drawback of this approach is any special formatting options like DIV containers and special markup will not be included. This is because when you actually login to your WordPress blog it sets a cookie which then allows the special markup to be included. A way to do this would be to use code like this :

curl -c [cookie file] -d log=[username] -d pwd=[password] http://[your blog’s address]/wp-login.php
now you stored the cookie WP gives you upon login. let’s use it:
curl -s -b [cookie file] http://[your blog’s address]/wp-content/plugins/postie/get_mail.php >>/dev/null

Unfortunately Postie meets my needs thus far and I haven’t figured out how to set up the CRON Job in the previous way. You are on your own now.

I hope this guide has given you some clarity about setting up Postie and if I missed anything please let me know in the comments and I shall update this guide.

Further Reading
Operator 11: The Best Live Video Web Application

I just finished participating in the first Jason Calacanis and Friends live show on Operator 11. You’ve probably seen UStream.tv and Stickam.com for streaming live video and heard about Talkshoe.com for live audio casts; Well Operator 11 is like both of those things combined and it makes for a whole lot of fun.

Operator 11 logo

If you ever wanted to have your own show live with user participation, than Operator 11 is the way to go. The Flash controls are intuitive and the quality isn’t too bad. As the director you can determine who is live and it lets you switch to different people with a click of the button. Participants can request they be put on camera via a simple button which shakes their video on the directors screen. Everyone in the live area can participate in the text chat that also gets displayed across the bottom of the video screen so people on the outside of the studio can see what the comments from the peanut gallery too. Other cool features include drag and drop video sources which let you switch to lpre-recorded clips and the whole show is recorded, saved and viewable to anyone who wasn’t there during the live recording.

Back to the CalacanisCast, things were going smooth at first and then Jason managed to crash the servers causing everyone to go into a spin-off room. After that, mayhem ensued and Jason began playing clips live off of YouTube and switching to shots of his dog Toro. Other highlights included Jay Adelson, CEO of Digg.com, and Robert Scoble who did a mighty fine Steve Ballmer impression (check the video at -21:15). I even got to say a few words but I was feeling shy in front of all the A-List bloggers; Afterall I am a nobody in the blogging world just like everyone else.

At the end of it all I had a lot of fun interacting with a bunch of different people from all over the world live and with video and sound. Operator 11 is sure to take off once more people start playing around with it. If you do go over and sign up add me as a friend and let’s get together and chat face to face sometime.

Check me out at -11:50, before the show ends.

Learn more about Operator 11.

How Do Most People Navigate an Online Slide Show

The web has created new ways to organize and display information. When designing an online slide show there are a slew of techniques one could employ to guide the user through the presentation. Should there be thumbnails? A next/previous button? Arrows? Should it be linear? Non-linear? Both? The list could go on and on.

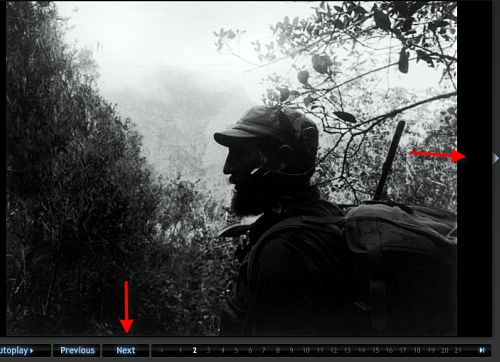
Nora Paul and Laura Ruel decided to probe these questions a little further using an eye tracking machine and 34 volunteers during a brief experiment. The participants were asked to view a Washington Post slide show titled “Cuba by Korda” which utilized all of the navigational elements mentioned above. There were no specific instructions given to the users and their only task was to navigate through the slide show for as long as they wished. Some of the interesting findings…

  • A majority of the participants relied on the Next button to progress through the slide.
  • People who used the Next button or right-hand arrow viewed twice as many slides as those clicking on the numbers below the photo.
  • Participants Using the arrows viewed the slides for the longest average time (3:31) followed by the Next button (2:34) with the Numbers people staying the shortest (2:16).
  • Viewers who chose to view the presentation linearly viewed an average of 20.75 slides while non-linear viewers saw only 6.5

Slideshow Navigation

As you can see, the web audience is a lazy bunch and it is unreasonable to expect them to view your content if it is hard for them to navigate through it. Hunting and pecking for numbers or thumbnails requires much more work than clicking a button that stays in the same place the whole time and because of the extra work the audience loses interest and gives up faster. Same goes for the linear vs. non-linear approach where non-linear requires more thinking and ultimately more work. This brief study only confirms the sayings of Steve Krug in his book Don’t Make Me Think: A Common Sense Approach to Web Usability.

Read more about the slide show study.

Safari on Windows: It Could Work

Safari on Windows Logo
Apple announced their Mac-only web browser, Safari, will now be available on the Windows side in a new public beta. Now in addition to the included Internet Explorer, open-source darling Firefox, cool-to-be-the-underdog Opera, blast from the past Netscape among many other browsers we now have the choice of Safari.

Who would choose to use Safari?

Lots of people due to its security over Internet Explorer and less-bloated memory footprint compared to Firefox. Safari is a good middle-of-the-road, basic browser for those merely interested in surfing the web and not into all of the technical nuts and bolts of the modern browser.

Sure, lots of Mac geeks who are forced to use Windows boxes will switch, but what about the average Joe?

I am positive they will come in contact with Safari sooner than you think. After this beta phase fades away and the official Safari 3 ships, Apple will bundle it with iTunes and Quicktime making millions of unsuspecting music patrons download and install the browser without them even knowing they had a choice. But why should iTunes fans care if they download some more Apple hub-jub? It is Apple we are talking about; maker of fine, easy to use software and stylish high-end hardware.

Apple won’t insist Safari be the default browser after merely installing it, oh no that would be too aggressive and pushy. Instead, iTunes will merely require it for some new fan dangled feature in the iTunes music store. Itunes could easily detect if you have Safari installed and launch special iTunes web content in the Apple browser of choice with a simple, harmless dialog asking the audience “Would you like to make Safari the default browser?” Any browser out there today will pop up this question and generally it is an accepted practice so long as the developers give the user some control like “Don’t ask again” or “Remember my choice”. Bam! Problem solved with no harm done and Apple’s browser market share will slowly begin to creep up. After all if it worked for Quicktime and iTunes why couldn’t it work for Safari?

Download the new Safari at www.apple.com/safari/